FTP Server Configuration on RHEL5
The File Transfer Protocol (FTP) is one of the most common means of copying files between servers over the Internet. Most Web-based download sites use the built-in FTP capabilities of Web browsers, and, therefore, most server oriented operating systems usually include an FTP server application as part of the software suite. Linux is one of them.
Step-1: Check FTP server package is installed or not
[root@ftp ~]# rpm -qa | grep –i vsftpd* or
[root@ftp ~]# rpm –qa vsftpd*
If not installed, then installed the packages using Yum command:
[root@ftp ~]# Yum Install vsftpd*
Step-2: Check and Configure the Network Card:
[root@ftp ~]# vi /etc/sysconfig/network-scripts/ifcfg-eth0
(Modified File):
#Broadcom Corporation Net link BCM57875 Gigabyte Ethernet PCI Express
DEVICE=eth0
BOOTPROTO=static
HWADDR=00:0C:29: EB: B2: CA
ONBOOT=yes
TYPE=Ethernet
PEERDNS=no
USERCTL=no
IPV6INIT=no
IPADDR=210.207.201.7
NETMASK=255.255.255.0
NETWORK=210.207.201.0
BROADCAST=210.207.201.255
Step-3: Change the host name by following this command:
[root@ftp ~]# vi /etc/sysconfig/network
(Modified File):
NETWORKING=yes
NETWORKING_IPV6=no
HOSTNAME=ftp
Step-4: Now Edit the hosts file for locally host name resolution by following this command:
[root@ftp ~]# vi /etc/hosts
(Modified File):
# Do not remove the following line, or various programs
# that require network functionality will fail.
127.0.0.1 localhost.localdomain localhost
210.207.201.7 ftp.alphabd.net ftp
Step-5: Edit the resolv.conf file by following this command
[root@ftp ~]# vi /etc/resolv.conf
search alphabd.net
nameserver 210.207.201.1
nameserver 210.207.201.2
After changing the above configuration you have to reload/restart the NIC(eth0) card by following command:
[root@ftp ~]# ifdown eth0
[root@ftp ~]# ifup eth0
[root@ftp ~]# service network restart
Change In Primary DNS Server:
Step-6: Edit Forward Lookup zone file for ftp server record
[root@ns1 ~]# cd /var/named/chroot/var/named/
[root@ns1 named]# vi alphabd.fz
Modified File: alphabd.fz
$TTL 86400
@ IN SOA ns1.alphabd.net. root.alphabd.net. (
2011022501 ; serial (d. adams)
3H ; refresh
15M ; retry
1W ; expiry
1D ) ; minimum
IN NS ns1.alphabd.net.
` IN NS ns2.alphabd.net.
ns1 IN A 210.207.201.1
ns2 IN A 210.207.201.2
ftp IN A 210.207.201.7
Note: Remember must change the zone file serial number (Forward lookup).
Step-7: Edit Reverse Lookup zone file for ftp server record
[root@ns1 named]# vi alphabd.rz
Modified File: alphabd.rz
$TTL 86400
@ IN SOA ns1.alphabd.net. root.alphabd.net. (
2011022501 ; serial (d. adams)
3H ; refresh
15M ; retry
1W ; expiry
1D ) ; minimum
IN NS ns1.alphabd.net.
IN NS ns2.alphabd.net.
1 IN PTR ns1.alphabd.net.
2 IN PTR ns2.alphabd.net.
7 IN PTR ftp.alphabd.net.
Testing FTP server :
To connect with FTP server from any client machine follow the steps:
First time when you try to connect with ftp server the connection will refuse by the server because the vsftpd services is by default stopped, so restart all the services,
Step-1: Test the ftp connection
[root@client ~]# ftp 210.207.201.7
ftp: connect: Connection refused
ftp>
Now quit from ftp connecting shell by using “bye” command & restart all the required services
Step-2: Testing the status of vsftpd:
You can test the vsftpd process is running or not by using “netstat –a” command:
[root@ftp ~]# netstat –a | grep ftp
Or you can also use the following command to test that ftp is running or not. If not running then restart all the services.
[root@ftp ~]# service vsftpd status
[root@ftp ~]# service iptables stop
[root@ftp ~]# service network restart
[root@ftp ~]# chkconfig vsftpd on
[root@ftp ~]# service vsftpd restart
Now try to connect with ftp server by following this command & you will get the result below that will ensure you’re connected with ftp server, but if you want to connect with ftp properly put the ftp username & password.
[root@client ~]# ftp 210.207.201.7
Connected to 210.207.201.7.
220 (vsFTPd 2.0.5)
530 Please login with USER and PASS.
530 Please login with USER and PASS.
KERBEROS_V4 rejected as an authentication type
Name (210.207.201.7:root):
Step-3: Create ftp account with Shared directory
Create group ftp-users as a group of ftp user account and share a directory named Resources in to /home/ as a share directory for the remote users.
[root@ftp ~]# groupadd ftp-users
[root@ftp ~]# mkdir /home/Resources
Make the directory accessible to the ftp-users group.
[root@ftp ~]# chmod 750 /home/Resources
[root@ftp ~]# chown root:ftp-users /home/Resources
Now add some users into ftp-users groups and make their default directory /home/Resources
[root@ftp ~]# useradd -g ftp-users -d /home/Resources user1
[root@ftp ~]# useradd -g ftp-users -d /home/Resources user2
[root@ftp ~]# passwd user1
[root@ftp ~]# passwd user2
Copy files to be downloaded by your users into the /home/Resources directory
Change the permissions of the files in the /home/Resources directory for read only access by the group
[root@ftp ~]# chown root:ftp-users /home/Resources/*
[root@ftp ~]# chmod 740 /home/Resources/*
Step-4: Now restart all the required services
[root@ftp ~]# service iptables stop
[root@ftp ~]# service network restart
[root@ftp ~]# service vsftpd restart
Step-5: Now go to any Linux client machine & type the following command
[root@client ~]# ftp 210.207.201.7
Connected to 210.207.201.2.
220 (vsFTPd 2.0.5)
530 Please login with USER and PASS.
530 Please login with USER and PASS.
KERBEROS_V4 rejected as an authentication type
Name (210.207.201.2:root): user1
331 Please specify the password.
Password:type the user1 password
230 Login successful.
Remote system type is UNIX.
Using binary mode to transfer files.
ftp>
If you can successfully connect with ftp server with user name & password, then your Server is running properly. After a success full login you can disconnect from ftp server by using “bye” command:
ftp>bye
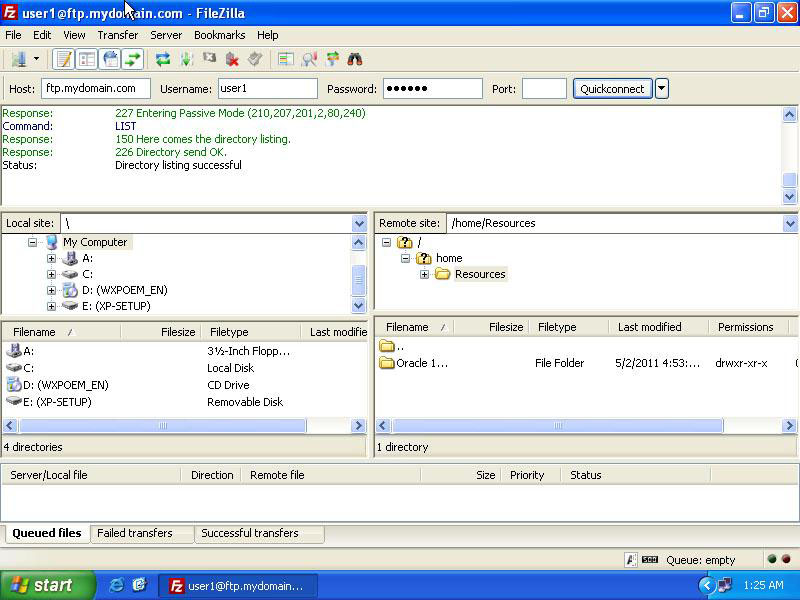
Step-6: Connecting ftp server with FileZilla
FileZilla is a fast, reliable, and secure FTP/SFTP client that allows you to transfer files between Web sites and PCs running Windows.
After Installing FileZilla you will find it, Start → Program → FileZilla FTP Client → FileZilla. Open FileZilla, & the window will look like below.
To connect with ftp server put the Host name, Username with password then click Quickconnect button, after a successful login you will see the window as like below,
Look at the window below here you will find two section of file directory one is Remote Site which is the ftp server shared directory & another is Local Site which is your Local machine directory. Now drag & drop a file from Remote site to Local site.
Note: Download the latest FileZilla Software from http://filezilla.en.softonic.com/download
Step-7: Connecting ftp Server with Anonymous User
Enable upload & Download access Permission for anonymous user:
Download
/var/ftp/pub is the ftp path for anonymous user to upload and download. If you want to provide download facilities for anonymous user, you have to keep default value (YES) for anonymous_enable (line no 12)
In this situation I m describing how to keep RHEL5 dvd file in /var/ftp/pub directory that your all clients can download & install packages via ftp server using yum.
Step-1: Copy the entire file from DVD source & keep it to /home/rhel5 directory
Step-2: Create a repository file for the DVD source in to the same directory
Step-3: Now create an ISO file for this DVD source named RHEL_5.4.iso in to /opt directory
Step-4: Now mount the ISO file in to /var/ftp/pub directory
Step-5: Now finally tell to your clients use this directory by configuring yum in every clients machine
Step-6: To download packages via ftp by using yum, you have to tell ftp full link in yum.conf file
Note: For more information see Yum configuration (also FTP section)
Upload
Generally, the anonymous user has no permission to upload file in ftp server. To provide upload in ftp server follow the steps:
Step-1: First create a directory in to /var/ftp/pub named “upload” & provide required permission for this directory
[root@ftp ~]# mkdir /var/pub/upload
[root@ftp ~]# cd /var/pub/
[root@ftp pub]#chown root:ftp upload
[root@ftp pub]# chmod 777 upload
Step-2: Now restart all the required services
[root@ftp ~]# service iptables stop
[root@ftp ~]# service network restart
[root@ftp ~]# service vsftpd restart
[root@ftp ~]# chkconfig vsftpd on
Step-3: From windows machine Open Internet explorer and then type ftp://ftp.alphabd.net, then you will see the pub directory as like below
Vsftpd.conf files Parameter:
Step-8: Now edit the vsftpd.conf file
To activate or deactivate a feature, remove or add the # at the beginning of the appropriate line.
[root@ftp ~]# vi /etc/vsftpd/vsftpd.conf
Directives | Line Number | Orginal File Text | Modified File Text |
anonymous_enable | 12 | YES | NO/YES |
anon_upload_enable | 27 | YES | YES |
anon_mkdir_write_enable | 31 | YES | YES |
dirmessage_enable | 35 | YES | YES |
xferlog_enable | 39 | YES | YES |
chown_uploads | 47 | YES | YES |
chown_username | 48 | Whoever | deamon |
ascii_upload_enable | 81 | YES | YES |
ascii_download_enable | 82 | YES | YES |
deny_email_enable | 89 | YES | YES |
banned_email_file | 91 | /etc/vsftpd/banned_emails | /etc/vsftpd/banned_emails |
pam_service_name | 116 | vsftpd | vsftpd |
userlist_enable | 117 | YES | YES/NO |
|
|
|
|
anon_other_write_enable | New Line | NO | YES/NO |
Note: Remove the “#” from line number 27, 31, 39, 47, 48, 81, 82 but do not remove “#” symbol from line number 89 & 91.
Some useful ftp command:
Command | Description |
ascii | Set ascii transfer type |
bell | Beep when command completed |
binary | Set binary transfer type |
bye | Terminate ftp session and exit |
cd | Change remote working directory |
cdup | Change remote working directory to parent directory |
chmod | Change file permission of remote file |
dir | List content of remote directory |
delete | Delete remote file |
get | Recive file from remote server |
image | Set binary transfer type |
lcd | Change local working directory |
ls -a | List content of remote directory |
mdelete | Delete multiple file |
mdir | Make directory on the remote machine |
mget | Get multiple file |
mkdir | Make directory on the remote machine |
mls | List content of multiple directory |
mput | Send multiple file |
pwd | Print working directory on remote machine |
quit | Terminate ftp session and exit |
rmdir | Remove directory on the remote machine |
rename | Rename file |
rstatus | show status of remote machine |
type | set file transfer type |
Example of ftp command:
[root@client ~]# ftp 210.207.201.7
ftp> mdelete *.jpg
ftp> mput *.jpg
ftp> mget *.jpg
ftp> cd /var/ftp/pub
ftp> bye
TIPS- For FTP Server
View FTP Log File:
[root@ftp ~]# tail –f /var/log/vsftpd.log
Restrict Access to Anonymous User Only: Add the following line in vsftpd.conf file
local_enable=NO
Disable FTP Upload: Edit the following line in vsftpd.conf file
write_enable=NO
USER LIMITATION: Add the following lines into the vsftpd.conf file
local_max_rate=50
max_per_ip=5
max_clients=10